-
• #1827
So the configurations I'm looking at... here's what Orion would look like.
Rectangles are what the camera could do, and circles are the various combinations of eye pieces.
This is a good example of deep sky visual and deep sky imaging.
1 Attachment
-
• #1828
And then the second usage is planetary stuff, and for that let's start with the Moon.
Camera combinations is still good for this, but visual is perfect here... could fill the scope perfectly.
1 Attachment
-
• #1829
For Saturn though... here you see the limitations, I could invest in what is needed to increase magnification as the quality of the scope could go there... but this is not what I'm aiming for, planetary will be visual only, though I might do imaging of the Moon.
1 Attachment
-
• #1830
That inner most visual of Saturn looks like this, and the other image is Venus... so planetary visual is spot on.
2 Attachments
-
• #1831
Ordered.
What I have coming:
- Scope = Takahashi FSQ-85EDX
- Mount = ZWO AM5N
- Guide = ZWO ASiair Plus Bundle w/ Guide and Camera
- Focuser = ZWO EAF
- Tripod = Sightron
Additionally 6mm and 25mm eyepieces, a 2x barlow, a 0.73 reducer, a 1.5x extender, and a Takahashi TOE 2.5mm eyepiece.
In essence, a hell of a good refractor scope with can be travelled with, a reasonably lightweight set of accessories, and a full ZWO deep sky object imaging suite.
I have a few adaptors to order still, awaiting verification on sizing and compatibility... and I also need cases, but I will await for things to arrive before ordering cases.
- Scope = Takahashi FSQ-85EDX
-
• #1832
Ooooh what a cool project VB (I realise that acronym is out of date and will happily stop using it if you prefer?)
I want to come over and play!
-
• #1833
Oh I should say, some of what I've ordered is a month away 😂
And I could've waited until things were in stock to order, or to order things that were already in stock... But why rush? It's Summer and there's little dark for a few more months.
This is all just time to get acquainted to the tools, to learn the system a bit.
I'm imagining an almost Full Metal Jacket moment of assembling and dismantling the rifle over and over to learn how to do so, for I'll need to take all this stuff I've ordered out to a vantage point to make observations, will be setting up in the cold at dusk or dark, and dismantling in the very early hours, so I need to learn how to do that well so that I can do it tired, a red light, with gloves on.
Specifically the mount is a new model that only got announced on Monday, and that won't arrive for a month... So there's nothing at all I can really do for a month.
Ordering now ensured I got one of only two FSQ-85EDX scopes that are in stock within the country, and the lead time on Taks if they are not in stock is more like 20-30 weeks, meaning next Spring, so I had to pull the trigger now just to make sure I could do stuff this Autumn and Winter.
-
• #1834
I want to come over and play!
I have no garden! And you really need a wide space, so a big garden or car park or hilltop.
You're welcome to come over and play with it all to learn it when I've got it all, but this is more like a drive out somewhere and spending an evening or night in the deep of late Autumn or Winter.
Totally up for that at some point if you are, I'll take a camping stove for hot drinks too.
Alternatively once I'm up and running, I'm planning to take this rig to the Baker Street Irregulars in Regents Park, so anyone is welcome to come along and learn, and to look through a huge variety of scopes: https://www.bakerstreetastro.org/
-
• #1835
but this is more like a drive out somewhere and spending an evening or night in the deep of late Autumn or Winter.
Sounds lovely.You drive I'll cycle!
I'll keep my eyes on the thread.
-
• #1836
You drive I'll cycle!
Deal.
Can't cycle with the scope... the whole thing weighs so much and is going to be a Pelican case + backpack thing.
-
• #1837
I may as well post these... these are the system charts for the Takahashi FSQ-85EDX scope.
System charts explain all of the combinations of crap that you have to screw on to the end of the scope to achieve whatever you want to achieve.
The scope is just a series of glass lenses within a tube... and they focus at a precise distance from the end of the last bit of glass... so when you want to do something you need to get the final bit, the eyepiece or camera, a perfect distance (within a fraction of a millimetre) from the end of the tube.
The scope publishes this distance, but most scopes (and all refractors) come with system charts too... and if you want to add reducers (reduce magnification) or extenders (extend magnification), these take different lengths to achieve their function and thus require different adapters to still reach the perfect focus.
And so... system charts.
The way to read these:
- Green are the outcomes I want to achieve... visual planetary and deep space, as well as imaging for deep space.
- Pink are the things already included with the scope.
- Yellow are the things I need to buy to walk the system chart and achieve the outcomes.
So yellow things become the shopping list.
There is an error though,
33, which isTKA02154 T-Mount DX-WR, this isn't needed... as I'll be using a ZWO camera and not a DSLR, and so there I needed the TakahashiOU073adapter to attach the ZWO camera.
2 Attachments
- Green are the outcomes I want to achieve... visual planetary and deep space, as well as imaging for deep space.
-
• #1838
You know how we typically say to someone, "When you buy a bike spend 1/10th of the value of the bike on the lock"?
I was curious what the ratios are for astrophotography stuff.
Through all of the combinations I researched at several different price points (an order of magnitude less than what I'm spending, all the way up to an order of magnitude more, the latter being to build an observatory)... the following is roughly true:
- 1/4 of your money goes on the actual scope itself.
- 1/4 of your money goes on the accessories for the scope.
- 1/4 of your money goes on the mount and tripod.
- 1/4 of your money goes on the camera and power.
The surprises here... I'm double my budget as I looked at the scope and mount prices and thought them reasonable, the camera was not too bad but the power added £700 unexpectedly, but the really big unexpected cost was the accessories for the scope... these are the eyepieces (~£200 each), the reducer (~£600), the extender (~£450), and then the various adapters (~£50-100 each) and finally what it takes to just point the scope at the right part of the sky, being the guide system.
So if anyone is curious... budget at least the price of the scope on accessories for the scope. This rule of accessories tends to work as a rule even for much cheaper scopes, and it tends to work for bigger scopes too.
This works for the mount too... the costs of the mounts and tripods correlate with the weight of the stuff you put on it, go cheaper on the scope and you either have a smaller scope (weighs less) or a dobsian (simple mount for visual only), or a small reflector (weighs less)... go more expensive on the scope and you probably have a bigger refractor (more glass, weighs more), or a big reflector (weighs more)... so what you spend on the scope seems to be a rough indicator for what you spend on the mount and tripod.
Finally, the camera also correlates to the scope performance, and the power system needed correlates to the camera as well as the mount.
So it's 25% each on scope, scope accessories, mount + tripod, camera + power.
- 1/4 of your money goes on the actual scope itself.
-
• #1839
Final order has been placed for the last few bits... https://www.firstlightoptics.com/ have done very well from me, but as they should, Alex and Ian there have both been absolutely incredible... trying to save me money (fools!) and advising on the compatibility of various things.
I should have everything in one month from now :)
-
• #1840
I gasp at some of the prices of equipment, but when you also have to figure in a trip to Tenerife to get results. His worry about his equipment in the hold fortunately did not transpire.https://www.youtube.com/watch?v=mT6G8i5Y8Ng&ab_channel=DamonScotting
The outlay and then the learning curve is astonishing hats off to the Boss for taking it on.
My aspirations and equipment would lean more towards Astro Landscape but still scared to make the investment. This chap inspires
https://www.youtube.com/watch?v=tcL7lFUUD-0&ab_channel=PaulHaworthNightscapeJournals
-
• #1841
^Agreed, I love Fenland Paul’s skyscapes
-
• #1842
outlay and then the learning curve is astonishing hats off to the Boss for taking it on
👀
Well the outlay is less than, or equivalent to, a very nice bike. It's not out of the reach of people, a bike shaped object is an entry telescope, a bespoke titanium thing with Dura-Ace is about as top of the market as astrophotography gets. If cycling is accessible, so too is stargazing.
I may simplify here the learning curve, but it's just a camera (or eyepiece) behind a lens... this is photography.
It's also more like photography from 100 years ago, it's slow photography where you do not really know how the outcome will look and so you have to experiment more.
In fact, I'd argue it's easier than photography as the universe supplies an infinite number of already composed incredible views, and they're there every night.
If one can understand focal length from photography (i.e. 20mm prime lens vs 35mm prime lens vs 55m prime lens) then one can understand that a telescope is just a prime lens at a very different focal length (the one I'm buying is 450mm). The only things that differentiates a camera lens from a telescope is that a telescope is optimised towards focusing on infinity and is designed to be mounted directly onto a tripod mount for very long exposures.
Even filters are standard in film and photography, who hasn't noticed the teal and orange filters in the movie industry, it's everywhere https://theabyssgazes.blogspot.com/2010/03/teal-and-orange-hollywood-please-stop.html and filters are used all the time in photography to balance the exposure, handle reflections, etc.
Filter use in astrophotography is mostly like polarising filter use in photography, to stop certain types of light. What astrophotographers are trying to stop is all of the local light from human made things, the photos really just want to include the light from the deep sky object, and not the light from Earth or local things.
Filters exist which allow just one wavelength to get through... which is far better than trying to exclude lots of different wavelengths.
This is the "Hubble" palette, also known as "SHO Hubble Palette", and it's made up of 3 distinct filters each allowing a tiny wavelength of light to get through:
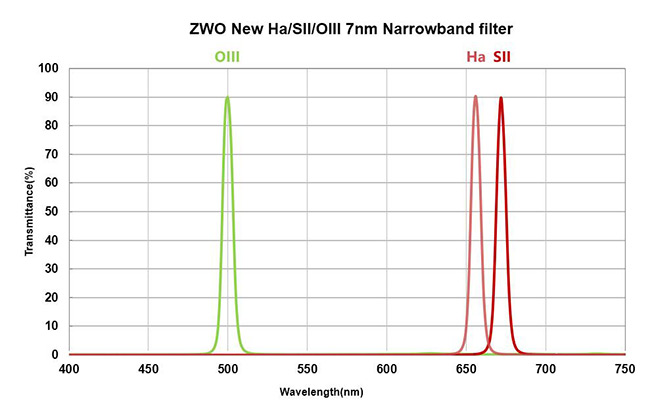
Where the wavelengths are:

What you need to know is that SHO stand for the first letters of the gases these filters target:
- S-II 672nm is Sulfur-II
- Hα 656nm is Hydrogen-Alpha
- O-III 496nm is Oxygen-III
Different gases have different colours and the light of those gases reach us at different times as the wavelengths vary, meaning to see a wavelength of light is to see a point in time.
But pictures need a few different colours to make them fully visible to the human eye, and the SHO Palette is an artificial palette where the different gases are mapped to red, green and blue:
- S-II is Red
- Hα is Green
- O-III is Blue
As nearly everyone uses the same colours you can look at the Tadpoles Nebula (IC-410) and see that there's a lot of Oxygen in this region:
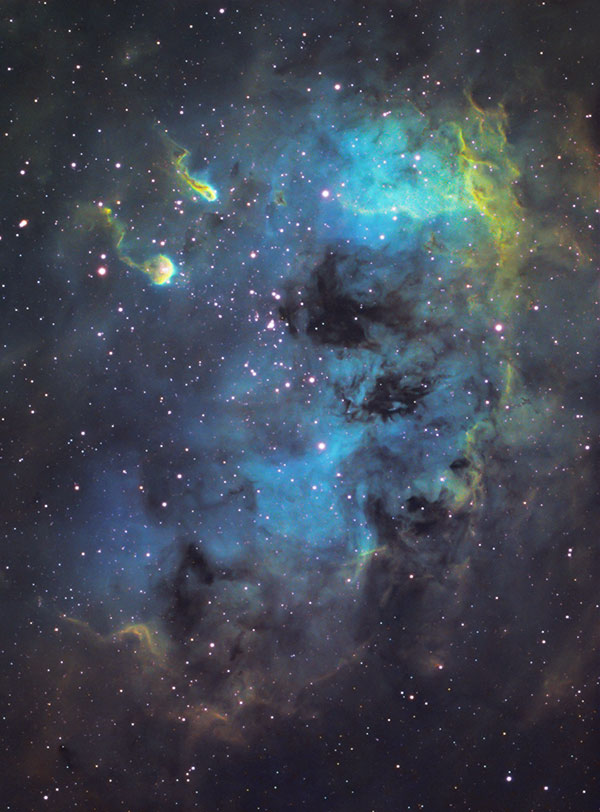
The above wavelength image of those are basically narrowband, meaning a single filter allowing only that lightwave through, so you take many photos of the same spot in the sky using different filters, and then colourise and layer together... this is not a new thing, this is how design and colour printing worked for 100 years, it's gels and films producing a colour magazine by layering different transparent films over each other.
I'm actually not doing that, I've bought a full colour camera, and that can take a pic of the whole sky, also known as a "one shot" camera as a single photo captures all colours... but the whole sky is full of light pollution and the advantage that using filters has is that it's excluding the light pollution.
Light pollution in most of the World is from street lights and such, i.e. street lights interacting with the atmosphere. So what you really want is a filter that lets through SHO but doesn't let through the various types of light pollution.
So I've gone for a broadband filter, broadband as it lets through multiple wavelengths.
This is what I'm going to be using:
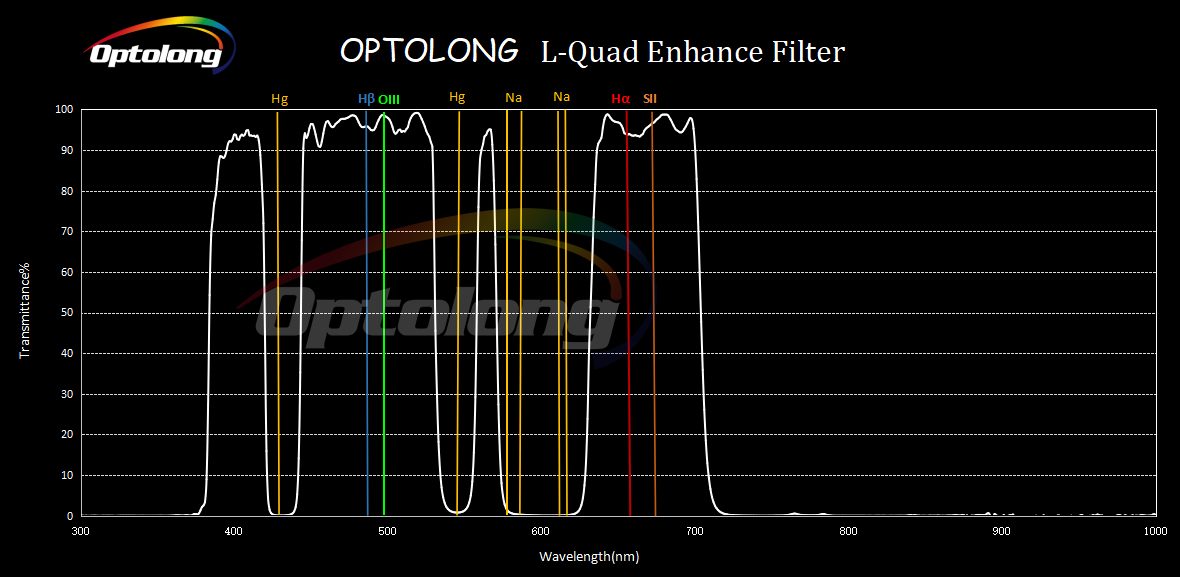
The white line shows that SII, Hα, OIII all get through, as well as other Nebulae colours, but the most common light pollution does not.
The only really unique thing about astrophotography, beyond the "needs dark and clear skies", is stacking.
The whole thing is about light, and very little light reaches us from these deep sky objects, and a tiny telescope on a rock hurling through space isn't going to have a lot of those photons hitting it. To stand any chance of getting a good picture you need a long exposure, tens of hours is not uncommon... but a camera in a fixed location pointing at the sky will have star trails after barely 5-8 seconds as we're on a rock spinning quickly through space.
To do long exposures then, you need a special mount used to hold the lens (telescope). It is special as it aligns to the Earth's axis, meaning it is aligned to the poles of the Earth, and it includes a motor and some technology to control the motor, such that it will gradually move the telescope at the same speed that the Earth is spinning so that the camera has a fixed view of the sky despite being on a rock that is spinning in space.

By this point you've just got a camera, with a big lens, on a mount that allows you to take long exposures of the sky (5 minute exposures!)... and yet you still get noise on the photo, a lack of detail, and some atmospheric effects, trails from a plane or a Starlink satellite.
Now software can help... just take 300 photos! If you take 300 pics of the same spot in the sky, let's say 300 x 5 minute exposures, then what you have is 25 hours of exposure. More than one night of doing this, could actually be 10 nights of only 2 and a bit hours per night. 300 pics though... software can do "stacking", which is to merge multiple pictures and to keep all the things that are similar in the pics, and to reduce in importance the things which only appear in one picture.
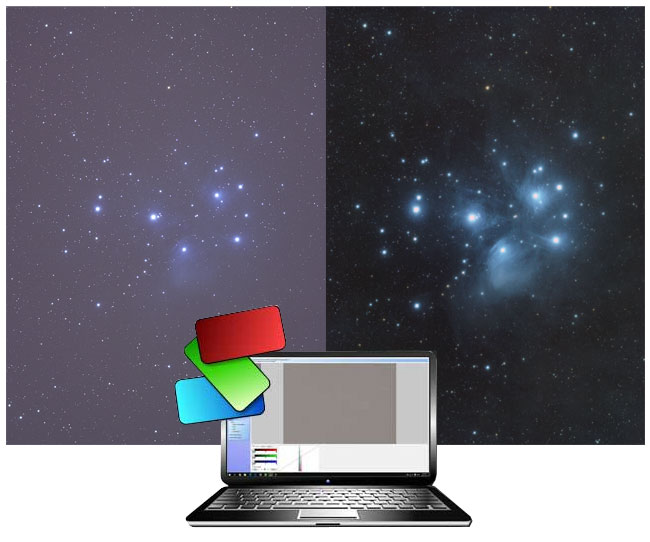
The effect of stacking is that with 300 x 5 minute exposures you have 25 hours of a deep sky object, and perhaps 2 seconds of a Starlink satellite whooshing by or a plane overhead, and only a minute or two of some specific atmospheric condition (haze, high altitude wispy clouds, etc)... the act of stacking enhances the deep sky object and removes the ephemeral conditions and light pollution.
And really that's it as far as I can tell.
Just a camera, a lens, a tripod with a clever mount, a filter, and some software to merge images together.
Sources, I wrote this post myself, but googled for images to explain things, and most come from a single site, so it's worth citing:
- S-II 672nm is Sulfur-II
-
• #1843
There is a bit more to image stacking, relating to signal-to-noise. If you put a stack of shit in, you get a stack of shit out.
Light frames - actual light data from the object you are taking an image of, overlaid with various sources of noise and errors
Dark frames - to capture CCD noise that occurs from a long exposure. The CCD produces electrical/heat noise in a somewhat reproducible pattern. By capturing a long exposure of CCD noise only (ie. you cover the aperture so no light gets to the CCD) you can subtract CCD noise from your light frames. I think you want to do roughly 0.5 - 1× the number of light frames. So if you do 20 × 10 minute light frames, you might also do 10-20 × 10 minute dark frames. I think every amateur should definitely be doing these when doing long exposures. Dark noise will be a significant fraction of your pixel brightness.

Flat field frames - if you point your camera/telescope/CCD at a plain white uniform field with no detail, you will see that the resulting image does not have uniform brightness, due to vignetting and CCD effects. You can capture flat field frames and try to compensate for the non-uniform image response in your light frames using flat fields. I've never bothered with this but you can do it easily enough by pointing the telescope at a bright thing, out-of-focus
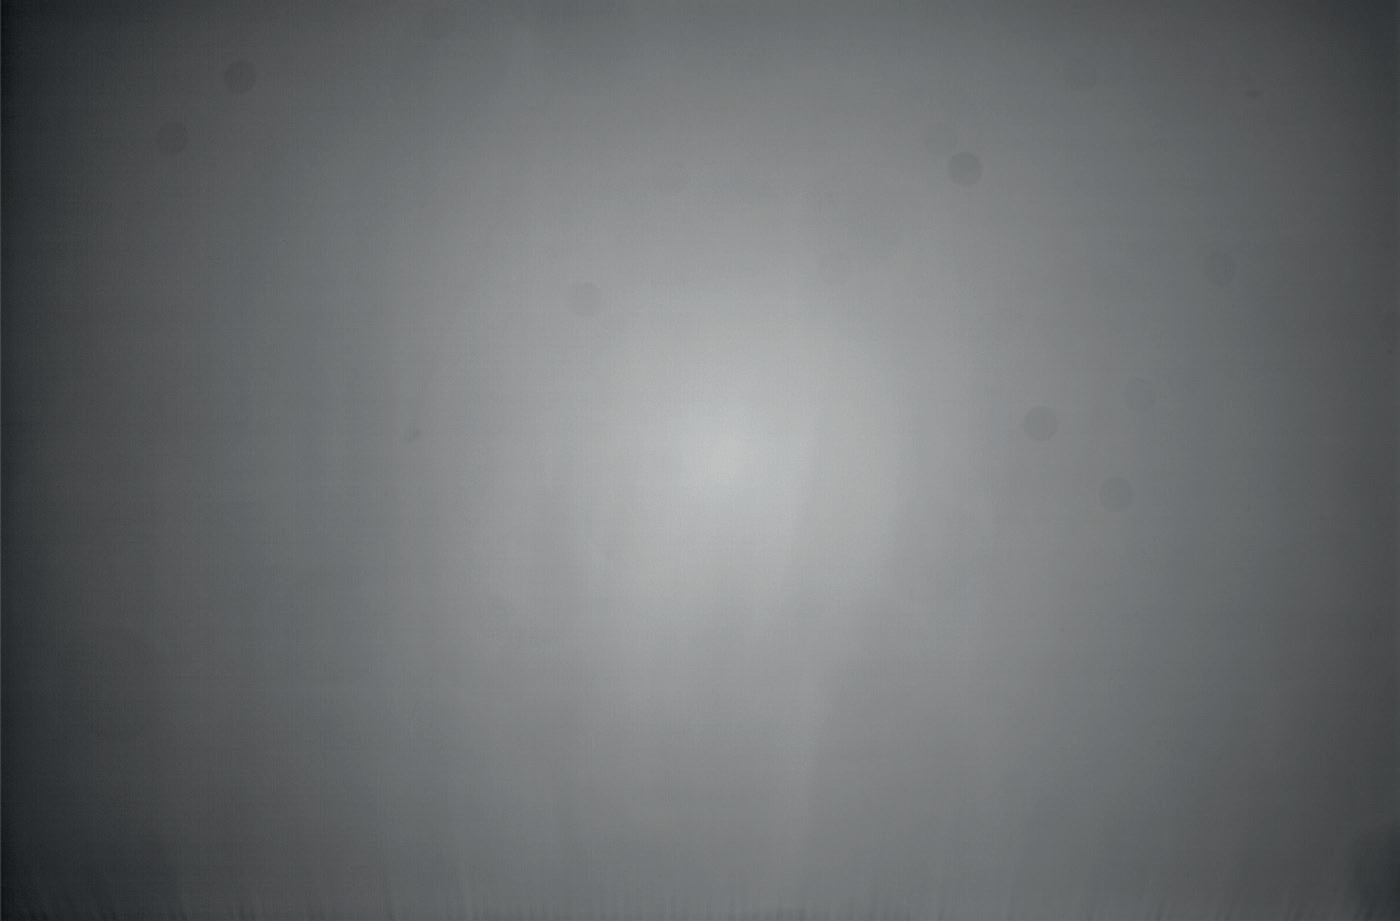
Bias frames - pretty much the same a dark frame but captures only the initial readout noise from the CCD rather than the noise that results from a long exposure. I think unless you're doing something really advanced you probably don't need this. (They look the same as darks but less noisy.)
Note that most of them are heavily dependent on ambient temperature and camera settings so there's not much point taking your darks in the middle of the day and light frames at night.
You also have astronomical seeing. Turbulence in the air reduces the quality of your image. Generally the "quality" is measured by the visible (or CCD) size of a single star which is treated as a point source. You may want to ignore the worst quality images as you can get a better image overall if you discard some of them. For a sufficiently long exposure this is not really necessary but eventually you will be limited by seeing and the next step to getting better results would be short exposures and being more selective with image quality, moving to Tenerife/Hawaii, and no doubt there are some amateurs doing adaptive/active optics as well.
Then you have a bunch of other more complex image processing techniques like super-resolution and deconvolution (when you hit the diffraction limit) which you will probably never need given the weather in the UK
-
• #1844
There is a bit more to image stacking, relating to signal-to-noise.
Thanks, these are very useful :)
Though I was simplifying ;) I didn't really go into Polar alignment, etc.
-
• #1845
Just a camera, a lens, a tripod with a clever mount, a filter, and some software to merge images together.
Thanks for taking the time to put all that information together in an understandable way. I think I got it, not that i would want to take a test on it.
In regards to learning curve, that's more a reflection on me. Early in the spring, no moon and forecast to be a clear night, i'm off to the Yorkshire Dales. Station pub carpark at Ribblehead, parked up for the night. Got my newly bought D3400, tripod and headtorch. In my mind i've got the Viaduct with train passing over, Whernside framed on the left, full starscape and the trail of one of the many flights going in to MIA. All my odd interests in one shot.
Reality Strikes
It was cold, misty, i couldn't see the display, couldn't see where i was walking, couldn't get Whernside and the viaduct in the frame and the trains were on strike*.But I learned. Mainly that the pub has a log fire and the beer is good.
- may have been added for sympathy.
- may have been added for sympathy.
-
• #1846
Reality Strikes
Oh definitely.
https://www.firstlightoptics.com/blog/clear-outside-new-kit-paradox.html
It's also been proven (1st April) that anyone ordering new kit also gets cloud coverage.
But yeah, my partner is "ooh, can I come stargazing with you?" and I'm definitely wanting to encourage and support without being old misery guts, it will be cold, it will be tiring, and for all that one endures there may not even be a usable set of photos at the end of it.
-
• #1847
Hmm... nowhere to mount the guide computer on the rig I have.
The Takahashi cradle has a bolt on top, and I was hoping to use that, but incredibly they don't sell the attachments needed to mount accessories on top of the tube.
The shop recommend tube rings to accomplish this, as then I can use a top plate. But yet they don't sell sizes which would work on my scope without a risk of damage to the dew shield.
So I think I'm going to be ordering some things from Japan... I need this kind of thing:

Tube rings with an M plate on top, to take the guide computer and potentially the guide scope, TBH I quite like that it has a handle too.
-
• #1848
More things arriving today... should be enough to actually put the telescope together and be able to focus on things, i.e. it's the last of the adapters required.
Still no mount, so it's not actually usable yet. And the tube rings and other bits aren't arriving until next week so as much as I can do before then is simply set things up in a mess, install and configure most software, test it all works, pack it all away again afterwards.
Oh well, it's something I guess.
-
• #1849
First tiny win is that I have enough of the equipment to put it all together, focus on clouds, and then set up the ASiair computer, guide camera and main camera... it all works, it's good.
Missing some very obvious things though, such as the mount, which means I can't actually set it up for a good few more weeks.
Also realised how absolutely shoddy the power bank I've purchased is, every component of it is the lowest possible quality. Will need to solve this aspect.
-
• #1850
How much power do you need?
 Velocio


 mashton

 Ludd
Ludd frankenbike
 Grumpy_Git
I think I agree with you enough that I'll opt for the colour camera.
It will still need a filter, but only needs a single broadband filter rather than a filter wheel with multiple narrowband filters.
I can't quite figure out if it takes longer to acquire with a colour camera and doing many single full colour shots, or a monochrome camera + filter wheel doing shorter exposures per colour, but having to do far more exposures to get the info.
I think ultimately, that it's a quality thing... a monochrome camera being able to capture more pixels, more control over which narrow band colours to capture, and a hypothetically higher QE factor for the camera... but this also feels like diminishing returns, like something I should do far into the future when I know I need to, rather than something I would do now.
All of the cameras I'm looking at are cooled and have some temperature control going on.