-
• #2377
Nice idea!
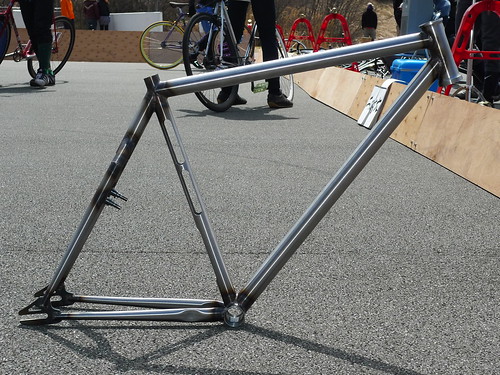
dude, i've done this with a dent on my frame
-
• #2378
dude, you didn't invent a dent in the frame to allow for tyre clearance.
I have never seen a full-on cut out, however.
-
• #2380
Dude, that's not a cut out.
But, as I said, I've never seen it before. Not saying it hasn't been done.
-
• #2381
True, it's not a cutout but serves a similar purpose.
As Em said, Eastern Bikes has done it before but it seems to have served no purpose...
and now you've seen two ;)
-
• #2382
Weight saving according to eastern. Shame that their frames had a habit of folding during the course of what is considered "normal" riding for their type of bike.
-
• #2383
picture posting excuse.


-
• #2384
dude, you didn't invent a dent in the frame to allow for tyre clearance.
I have never seen a full-on cut out, however.
never said i invented, just that you've seen someting similar before. dent is probably more user friendly than having a cut-out and your frame filling with water.
-
• #2385
dude, wtf is that bike? looks awesome flatland? polo? commute?
-
• #2386
For any noobz out there looking to build their first polo bike this cheap and dirty polo steed project of mine may be of interest:
Frame:
21” steel MTB frame salvaged from a skip, with short and quite steep headtube for quick steering and good torsional rigidity. All lugs and braze-ons removed. Rubbish pressed-steel seatclamp ground off and replaced with modern alloy clamp. Chrome, one inch threaded headset with caged ball bearings, which are replacable and cheap.Forks:
Steel MTB 26” forks. Tried shorter 24” ones, but no real advantage and a bit too quick steering.Wheels:
Front – 26” alloy hub and rim. 1.5” slick tyre. Home-made wheel disc. Solid, nutted axle.
Rear – 26” MTB front disc wheel, converted to rear use with longer, solid, nutted axle and a cog from a dismantled cassette drilled and bolted to disc flange(Fixed). 1.5” slick tyre. Home-made wheel disc. I tried converting a shimano cassette freehub rear wheel to fixed and, although it worked well, the bolt on method is stronger and is quicker and easier to do.Bottom bracket/Crankset:
BMX-style bottom bracket and one-piece steel crank for strength and ability to use solid 1/8” BMX chainrings down to very small tooth count which are readily available and cheap. Black plastic BMX 1/2” platform pedals (sacrificial in a spill) with home-made powergrip-style straps.Handlebar/Stem:
22.2mm stem is super-strong BMX 4 bolt top loader alloy clamp with short reach. Bars are home made from cut down and welded-up BMX bars.Brakes:
Front cantilever, very powerful, easily adjustable and quick release for easy wheel removal.
Rear – no brake, fixed wheel.Current gearing – 38:24 giving aroung 39 gear inches and 12 skid patches on 26” wheels. May go to 33:20 in the future when I change chainring and cog for new ones, rather than salvaged ones.
Most parts were salvaged, secondhand or surplus that I had lying around. Only parts I had to buy were the tyres - £12.50 from Ebay.
Total cost - £12.50
Currently being used and abused playing polo in Newcastle. Testing is going well with only a few adjustment needed.
Prepared for a flaming from established members but WTF.
4 Attachments
-
• #2387
£12.50, amazing, that didn't even cover the cost of em's inner tubes.
-
• #2388
...a cog from a dismantled cassette drilled and bolted to disc flange(Fixed).
Any more details on how you went about doing this? -
• #2389
-
• #2390
I would put a UV tube in the cut out. Rad to the max.
-
• #2391
Off topic, I know, but does anyone have a spare 17t freewheel? Abi just had both her wheels nicked.
-
• #2392
I would put my little fella in the cut out. Rad to the max.
gosh.
-
• #2393
bmx has radial rear as well, weird!
-
• #2394
that bmx is a "st martin" flatland.
-
• #2395
Any more details on how you went about doing this?
Not that tricky, actually.
Place the brake disc on top of the cog, taking care that the centres are concentric, centre punch through the bolt holes in the disc to mark where to drill the cog. I found it easier to mark one hole, then drill it, bolt the disc and cog together, then mark the next hole, etc, etc. I also used a bench-mounted pillar drill but I guess you could use a hand held power drill if you're careful, and it's all you've got. Also, use the best drill bits you can afford. I ruined several doin this. -
• #2396


Built up, hadn't realised it was a 26" frame. Max tyre is 1.5 though.
I still maintain, all it's all gimmick. -
• #2397
nah, that'll hold up under rik or horatio fine!
NOT!!
-
• #2398
it looks like a scaled down bike for 700c
-
• #2399
looks like a bruiser with some holes cut in it
-
• #2400
Most parts were salvaged, secondhand or surplus that I had lying around. Only parts I had to buy were the tyres - £12.50 from Ebay.
Total cost - £12.50
How polo has changed... Once upon a time I would have been impressed by this.
Now I like expensive and over-engineered polo bikes!No bank-loan no polo!
 dogsballs
![Avatar for Mike[trampsparadise]](https://lfgss.microcosm.app/api/v1/files/234d264db96466e0e7aa35dd06b600d167573076.gif) Mike[trampsparadise]
Mike[trampsparadise] Object
 Glowbike
 snoops
 vikingfixed
 turnpedal
 Bearlegged
 M_V
M_V

 (dan)
(dan) playswellwithotters
 mattmadegood
 Dr_Chan
 Cohen
Cohen hurricanejosh
 brain-flick
 @Shinscar
p;ssed