-
• #2
Put the gears and mudguards back on, looked great before!
-
• #3
I bought it in immaculate condition...
I'm trying to keep this on the cheap...
Bearing in mind the above, I would change as little as possible.
It's never going to be a "rad street-whip" (slack geometry, large clearances, curved fork), so work with what you have and keep it "classic" looking: silver components, non-aero levers and stick the mudguards back on (which will also fill the tyre/frame gap, as well as being practical).
If it's had little use, then the components ought still to be serviceable so there's no need to change them, which fits the "cheap" part of your brief as well as keeping it classic.
The front chainline will need tweaking, but that doesn't necessarily mean new cranks or even a chainring.
The chainline of the inner ring should be 41mm, whereas it's 42mm at the rear: not perfect, but it'll be fine. Then you'll just need to remove the inner ring and replace it with the big one. Old chainrings like yours pre-date the introduction of ramps and pins which aid shifting, so are fine to use fixed/SS. You'll need new, single ring specific chainring bolts though (about £7).
However it's possible that the big ring will foul the chainstay, in which case you'll either need a smaller ring or to stick with original inner ring.
If you do want to use the outer chainring position (using the inner position alone does look a bit shit), then you'll need a new bottom bracket (about £15 for a Shimano UN55). You'll need to measure the chainline of the outer ring (see link above), measure your current bottom bracket and do some maths.
The outer chainline should be 46mm and you want 42mm, ie you want to move it inboard by 4mm. So if your current BB is 118mm, then your new one would want to be 110mm: 118mm - (2 x 4mm) = 110mm.
You may find that the exact size BB you need isn't available, so you may need to compromise a little. You may find that the crank now fouls the chainstay: you can get an idea of whether this will be a problem by measuring the gap between the crank and the stay and comparing it to how much you need to move the crank in by.
You could fit dual pivot brakes, but it's not straightforward. Your bike takes brakes that are secured with an external, hex nut; dual pivot brakes use a recessed tube nut with an Allen head.
The most straightforward but expensive option, is a pair of Tektro R559: they're DP (and long drop) but have a nut fitting.
Or you could widen the hole in the back of the fork to take a tube nut, but without a pillar drill it's easy to get that off-centre which would mean your brake is also off-centre.
For the rear you could get another front brake, as they have a longer thread which would allowing you to secure it with an external nut. Or you could drill the back of the bridge (you won't get a drill in the front) and mount the brake backwards, but you have the same problem with keeping the holes co-axial and it looks a bit shit.
Myself, I would keep the existing brakes but replace the pads (they'll be perished and useless), cables and levers to improve the performance: people have been riding single pivot brakes for yonks without issue.
A compressionless cable kit will remove the spongey feeling and new pads sharpen up the actual braking. The extensions on your current levers are worse than useless (known as "suicide levers") and look shit: drilled Weinmann levers would suit the build and can be had off of eBay for £15 or so.
-
• #4
Thank you for the amazing reply, I'm going to take the lot on board and see what I can do :) I appreciate it's not a beauty and hence will keep it simple as you suggest.
The mudguards are going back on it as yes, the tyre gap grates on me and needs filling! I also hate getting a wet back in the rain.
Chainline is going to be the challenge, I have seen a few videos online showing how to do this, and will check out Sheldon's page on it!
RE the brake calipers; I do have a long reach tektro rear caliper I attempted to fit last night, however, they weren't long enough. The recessed bolt was fine as this frame is really weird and has a flat plate to attach the rear components to...I'll try and show you a picture later on. The current pads have leather strips in them, I did replace the front ones with new pads but still have pretty bad stopping power. I do need to tinker with them this weekend to fine tune them as I hastily put this together as the light was failing last night
Suicide levers will be gone as soon as I fine some replacements. Not sure if I can just remove them and keep the current ones?
Thank you
-
• #5
You're welcome.
Not that it's any of my concern, but I wouldn't like to see you throwing money away trying to turn it into a "sweet whip" when it will never be that.
For not a lot of money you could have a very serviceable and rather nice looking bike, but it was rather modest when new and always will be. However it is in great condition and if you accept it for what it is, then it will offer you miles of smiles.
Learn the basics on this and save your cash for something nicer when you have a better idea of what you're doing.
Looking at it another way, you can make the tyre/frame clearance work for you: as well as allowing mudguards, you can fit wider tyres. I'd guess that you'll have clearance for 28mm, certainly 25mm.
Chainline isn't so hard: take some measurements and post back here before spending anything.
#Protip To measure the front chainline, rather than trying to guesstimate the centre of the seat tube, measure from the centre of the chainring to the inside of the tube and then repeat but to the outside of the tube: add the measurements together and divide by two.
A set of calipers (rather than a ruler or tape measure) will make this much easier and more accurate: Vernier are preferable, but you can get a digital set off of eBay for stupid-cheap (<£5) and they'll be forever useful.
A flat plate, seat stay bridge wasn't unusual on cheap bikes and does make it easier to fit a dual pivot caliper. However, most of your braking should be through the front, so you need to get that sorted first.
After thirty-odd years the calipers won't be very slick. They're easy to disassemble (take photos with your phone at every stage). Lightly rub the surfaces that contact each other with some fine sandpaper or Emery cloth to get ride of any corrosion and crud and lubricate with a dab of light oil (Three-In-One, sewing machine oil etc). Some versions used plastic washers which may have perished: cut new ones from a plastic milk bottle.
Then get some compressionless cable on there and cut the front longer than it currently is: the more gradual and smoother the curve, the less friction. If you push the big loop at the rear of the frame, back through the cable guides I expect it will be the right length at the front; you can then match the front cable. And the cables should route behind the bars, not in front as they currently are. Search for photos to get examples (but note that racers, particularly time trial, tender to have shorter loops than is ideal).
If you're still not happy, then switch the new pads to the back and get some Kool Stop Salmon pads for the front. I bought some for £6-odd a couple of years back. They look like this:

The pads with leather inserts are for the steel rims your bike originally had.
Setting-up single pivot calipers can be a faff as when you tighten the nut, the whole caliper twists. With a cone spanner, you can hold the caliper centred over the rim while you tighten-up the nut.
You can't remove the extensions from the levers, except by cutting them off and the remaining piece still reduces the distance you can pull the lever until it hits the bar. Best off replacing them with a version that have rubber hoods on them. It's worth paying a little more for a pair with good (not perished/hardened) hoods: replacements are available, but they'll cost you a tenner or so.
Your levers are currently in a good position, but the bars need rotating down so the "hooks" (the flat part at the bottom) are closer to (but not exactly) horizontal. If you replace the levers, remove the bars (no need to remove them from the stem, just remove the whole unit) and lay them on a table etc, so the hooks are laying flat: the tips of the levers should just touch the table.
-
• #6
PS If you'll be riding fixed (rather than single speed), you need to budget for some form of foot retention (straps or clipless pedals).
Without retention, if your foot slips off the pedal then you'll bark your shins at best, or break your ankle at worst...
-
• #7
The advice about the bar rotation is pertinent as I could feel that something was off with them, but upon measuring the position of the levers and seeing were in the correct position I still couldn't work it out. Never thought that it was the bars!
I've never heard about the brake cable distance, so thanks for that nugget of info. Really good advice. The calipers will be off and cleaned today, new pads and cables installed. I may have sourced some new levers with rubber hoods on here too.
I tried removing the cranks last night but they appear to be fused on to the BB spindle; the crank puller has done a number on the interior threads (I did remember to remove the nut first!) the aluminum threads may have well of been cheese. Might have to be a brute force effort to get them off. Turns out the nuts on the two sprockets are decorative only and they are non separable...so not sure what to do on that front..
-
• #8
What I do with "classic bend" bars, is to slacken them a little (so they can be moved but aren't loose) and sit on the bike with my hands on the hooks: easiest if you can get the bike in a turbo trainer, but do-able with one foot on the floor.
Then rotate the bars back and forth until you find a comfortable position: having the wrists straight works for me, which puts the hooks about 15 degrees above horizontal.
Considering how long the cranks have been on there, I'd have be more surprised if they had come straight off.
If the rings aren't removable then the cranks aren't much use to you, which at least gives you the option of "destructive removal": some suggestions here and here.
The BB won't be any use to you either so don't worry about damaging that.
-
• #9
I was thinking the same about the cranks. It's a shame as the outer chainring lines up perfectly with the rear cog on the wheel. Will have a go at the two methods off getting them off.
Brakes barely needed cleaning, they have so little marks/build up of anything. it's almost as if they are new. The small washer you spoke about is in mint condition. The spring on the rear wheel was pretty weak, so I may have to do something about that. I'll probably rob one off of some other Weinmans I have laying about.
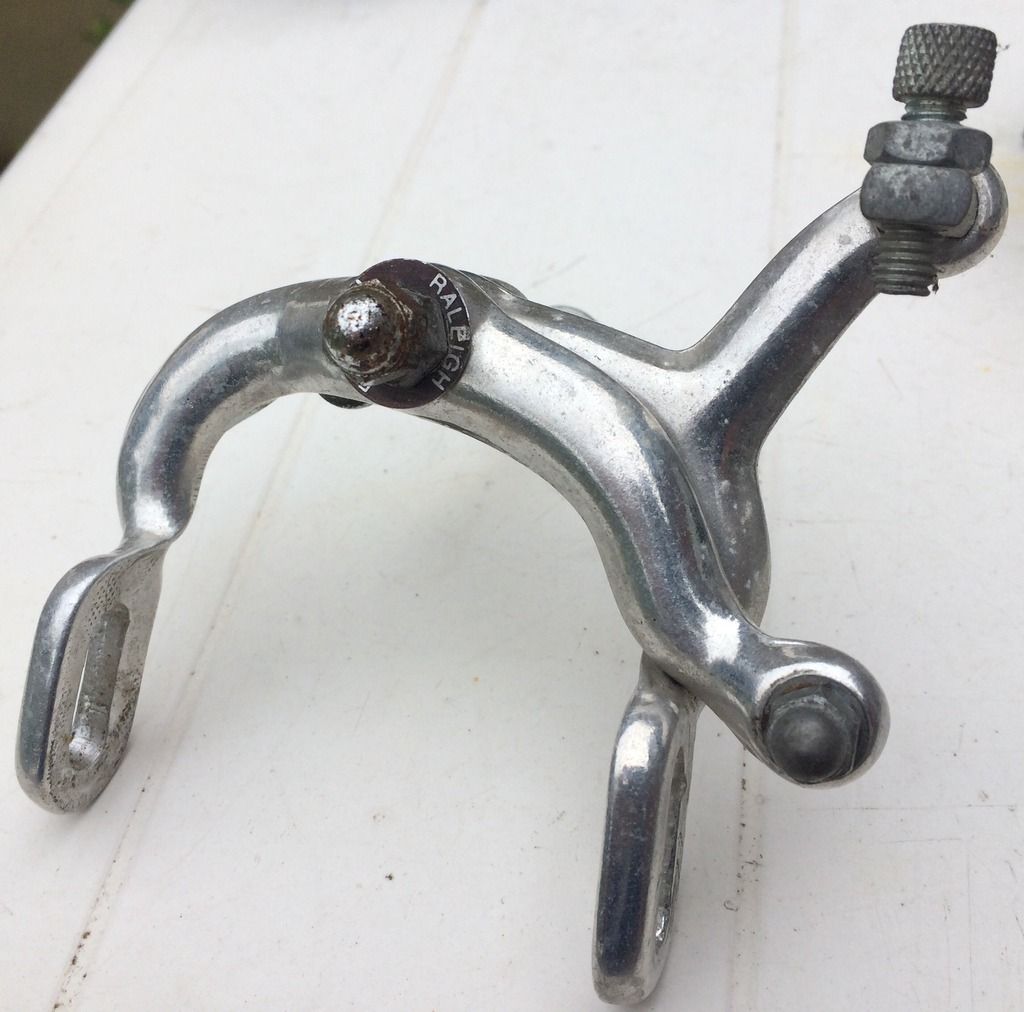
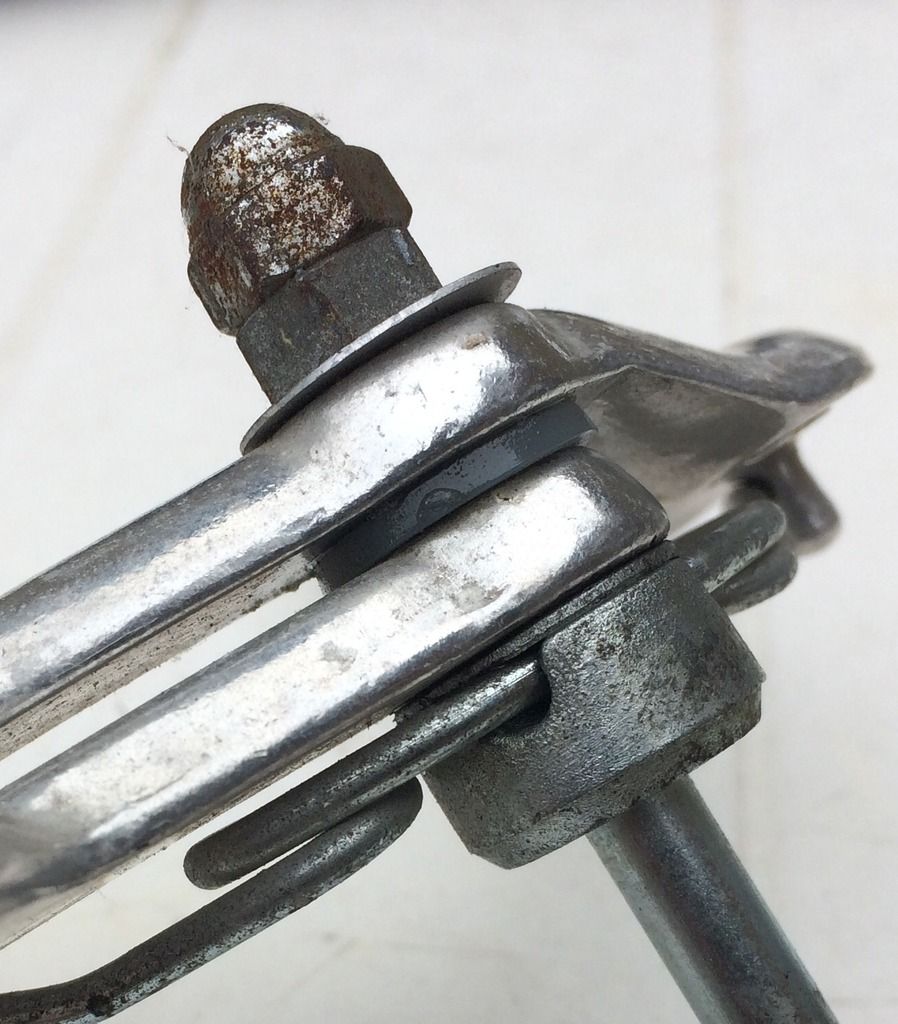
All the parts on this bike seem to be Raleigh, but the frame is 'BSA'; not sure why that is!
-
• #10
the outer chainring lines up perfectly with the rear cog
Have you measured the chainline?
If they do match, then I wouldn't bother taking the cranks off: apart from the faff, this is supposed to be a cheap build, Right? ;)
Even with the cranks on the bike, it should be possible to get at the inner ring with a Dremel.
Is that the rear brake? Doesn't look to have much drop.
-
• #11
Following this as I'm also converting an older racer to single speed - mostly as a way of organizing an excess of leftover bits from other projects...
Regarding parts - Raleigh bought BSA (cycles division) in the late '50s along with the New Hudson and Sunbeam brands, so it's likely a BSA frame will be have Raleigh components.
I can't tell if your new wheelset is alloy - if it is, you need to replace the leather blocks as they will quickly destroy the rims. I'm still using mine, but then I've kept the original steel wheels...
-
• #12
Ditto. I've done a rescued-from-the-skip SS conversion on a Falcon Black Diamond. 27" wheels and gas pipe, it was always screaming 'frankenbeater', so I didn't worry about keeping the cockpit sympathetic. Nor the saddle. I just went with what worked for me.
So. It's ugly, mismatched all over, handles like a fridge/freezer: But I spend more time on this than my road bike and actually look for reasons to pop out for a quick spin on it : ) -
• #13
So before reading this I actually managed to get the cranks off. Amazing what a soak with WD40 will do! The BB seems ok, it's still running smooth and I don't think I've damaged it either...I've measured the spindle length with a ruler and two credit cards as markers (no verniers yet unfortunately) and it seems to be 120mm...

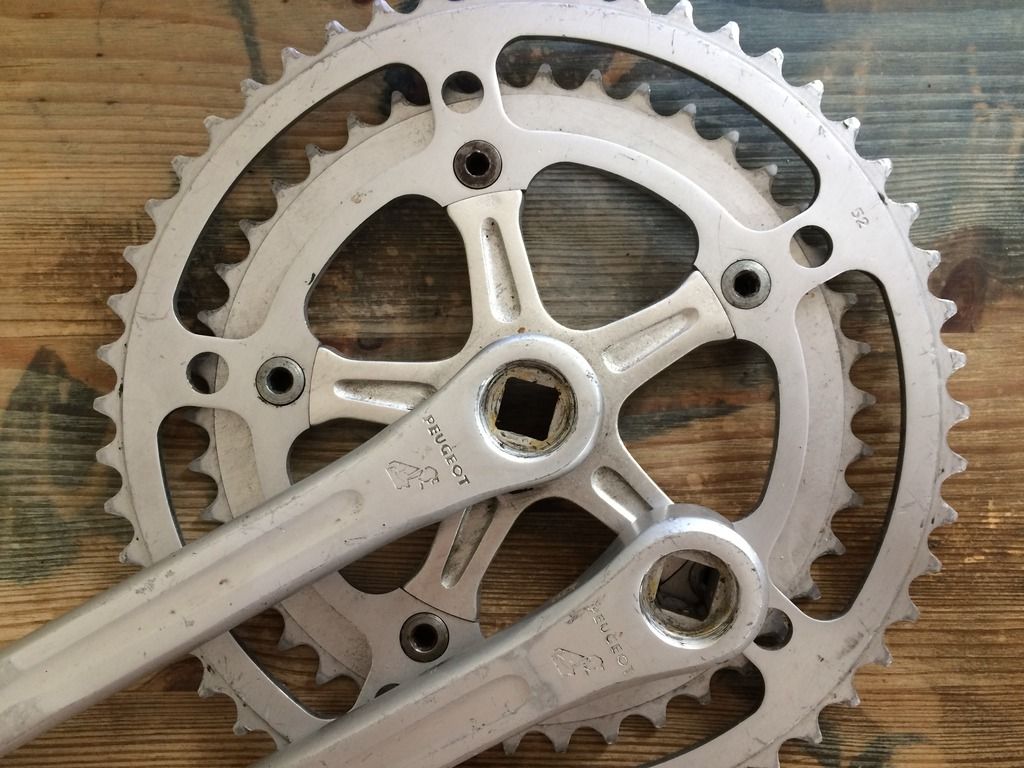
However, the cranks are now not usable...I do have this pair of cranks I picked up for a fiver a while back with the aim of replacing the ones on my other Peugeot. I wonder if they are any good for this? Its a 52/42 arrangement and appears to be able to be disassembled (not the bolts on the spider...Are the spiders a standard size? I either have to locate a new rear cog, or a new ring to make them compatible...
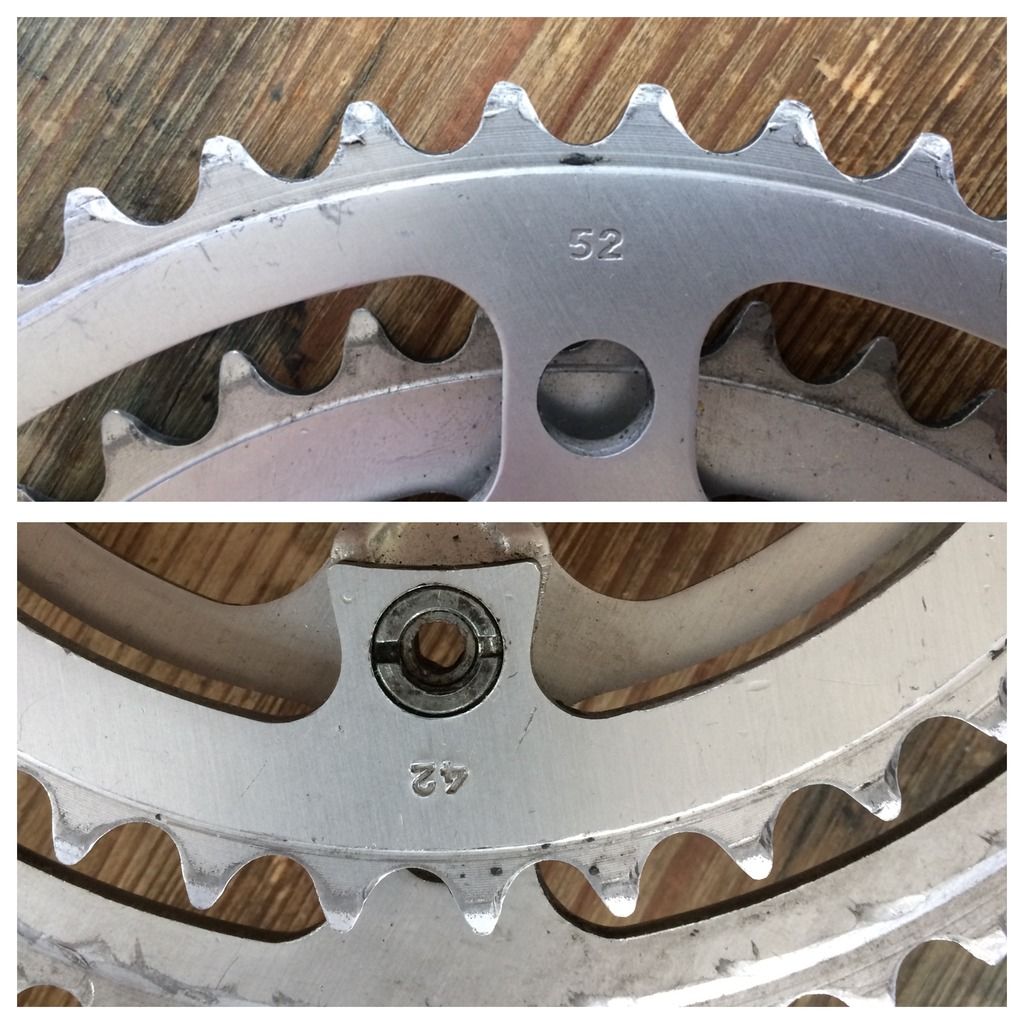
The rear drop outs are spaced 120mm with 17mm from inner of dropout to center or rear cog...so that means a chainline of 60-17=43mm? Does that sound correct?
That brake was the front, it has less of a drop than the rear.
@MrE Thanks for the info on the BSA Sale; I thought it must have been something like that. They original steel rims are off and these are some aluminium ones I've purchased from this site. I've whipped the brake pads off as well, and have some regular ones on order.
-
• #14
Amazing! I have a couple other bikes but am looking forward to having this as my runaround/frankenbike so I don't need to worry too much about leaving it places.
-
• #15
Oddly, mine is also a Falcon frame, very much not Ernie Clements era, now with 1950s saddle, 1960s Phillips crank and bars, 1970s Raleigh wheels and a new (new!) inner tube.
1 Attachment
-
• #16
wowie that's nice! I love the back-drop too! Did you have to remove the second inner chainring from the crank?
-
• #17
No - the crank is from an early 60s Phillips 3-speed, so a single chain ring from the start.
The chain line was sorted by removing the 1970s 5-speed spacer and replacing it with a second pair of nuts, allowing the wheel to be adjusted side to side, then altered the dishing to centre the rim. Time consuming but £cheap. -
• #18
That's a result, but when I wrote that the BB will of no use to you, I meant that it will be the wrong size rather than being unserviceable: 120mm will be much too wide/long to get a 42mm chainline and different cranks require different width/length BB.
Bearing in mind measurement error, 43mm for the rear chainline sounds about right (it will actually be 42mm).
You can space the rear sprocket a little (eg 1mm), but it's better to tune the front to the rear: if you space the rear sprocket too much, then you won't have enough thread engagement for either the sprocket or the lockring.
The cranks will likely be re-branded Specialities TA or Stronglight which often had a non-standard BCD spider: measure from the centre of one chainring bolt to another.
Rings to suit aren't uncommon, but it may well be cheaper to get some Shimano pattern cranks (130mm BCD) than source a suitable ring.
-
• #19
Ahh I see what you mean! Ok so I'll pick up a new BB as well.
The BCD of that crank is more like 122mm, so probably best to pick something different up...
When you say space the front sprocket to the rear...I presume that means buying a suitable crank/BB combo? for example, I know I have a 68mm BB shell so from there should be doable to work out if the parts will give the same chainline? Or would using the 52 tooth ring and use spacers as Sheldon suggests in the article until it reaches the 42mm limit?
Thank you for all the replies, I really have learned a lot from you! -
• #20
Confirm the BCD, then have a browse through eBay: you never know what you'll find...
You could re-space the hub, by moving any spacers from the DS to the NDS, to shift the hub outboard to increase the chainline. But then you need to re-dish the rim, so it's central in the frame again.
Easier to use the BB to adjust the front chainline to match the rear. Spacing the chainring is only for fine-tuning: I wouldn't want to be putting torque through something at the end of too long a lever.
You could browse through Velobase in the hope of identifying the Peugeot cranks. You'd then know what the size of the original BB was and could calculate what size the new one would be, assuming the position of the chainrings followed the road double standard (I don't know if things were different BITD and the French tended to do their own thing then).
But there are so many of that style of crank, I don't fancy your chances: everyone made that style, which is a copy of the Campag Super Record crank.
However it's always preferable to measure what you actually have in front of you, than rely on what the internet says. Fit the Pug cranks to the BB you have in the frame and measure the chainline of the big ring. Once you know how much it needs to move, you can also check that it will clear the chainstay.
You're welcome, but just because I'm the one shouting loudest, it doesn't mean I'm right: confirm what I write yourself!
-
• #21
Managed to get some more time to spend on the bike. Confirmed to be 122BCD by both methods of measurement. Will fit the cranks back on to the BB and measure the chainline etc to get an idea of how much I need to adjust...
-
• #22
122mm is Stronglight.
Hilary Stone has a few rings around 46t/47t for ~£30, which would be better for fixed than +50t.
He's got a good stash, but is generally a little pricey so you might have better luck on eBay or Retrobike.
PS Your searches might find ads from Hilary on LFGSS: he's no longer active on here so don't bother trying to contact him via the forum.
-
• #23
Thanks for the advice. I'll have a look around for it now I know the size; I did think that 52t might be a bit steep! I did find a 48t 1/8" stronglight on ebay (http://www.ebay.co.uk/itm/NOS-48-TOOTH-STRONGLIGHT-122-158BCD-1-8-TRACK-PISTA-CHAINRING-/391830876759?hash=item5b3af0b257:g:9KYAAOSwP~tW2ztW) for about that price ...if I got that I'd not need to replace the rear cog right? I tried fitting the old chain on the rear cog and it didn't fit...so my thinking is that it's a 1/8" one...
-
• #24
If you plan on keeping the rear sprocket, I assume a 48t ring will give you the ratio you're after? There's no reason not to use the 52t ring: 19t, 20t or 21t sprockets would all give you useful gears, depending upon what you'll use the bike for.
And assuming the 52 clears the chainstay, a new sprocket will be half the cost of that ring at worst. But whatever you decide to do, I suggest you sort the cranks out before buying anything else, in case they don't work for some reason.
It's your money, but I'd spend it somewhere else than Stigshed: like Hilary Stone he's a trader and a bit pricey (more so than HS even) and he's a prick who doesn't know what he's talking about.
He's recently been responding to people's wanted ads on here, by posting links to his own eBay sales which is snide because he doesn't identify himself, so people would assume it's an impartial recommendation.
And there's no such thing as a 158mm BCD crank or chainring: the outer circle of holes are decorative only, just like on yours.
If the old chain doesn't fit, then it likely is 1/8". If either the ring or the sprocket are 1/8", then the chain will have to be 1/8" (but it's ok to mix 3/32" and 1/8" rings and sprockets).
-
• #25
Awesome, I didn't want to have to have that as the only option and I'm liking the idea of the 52t with a larger rear sprocket. I was going to test the 52/17 and see how it is first but assume its going to be a bit of a high ratio. I assumed if I just got a 1/8 chain it would be ok(ish) on the 3/32 52t ring I have, albiet a bit loose...
Think I'll need some new chain ring bolts as these are worn/getting toward rounded and also too long for the single chain ring.
Does removing the inner chain ring mean that the chain line will alter? I can't see why it would but then I've not done it yet...
 edmundro
 Scilly.Suffolk
 dirac
dirac MrE
MrE vilms5000
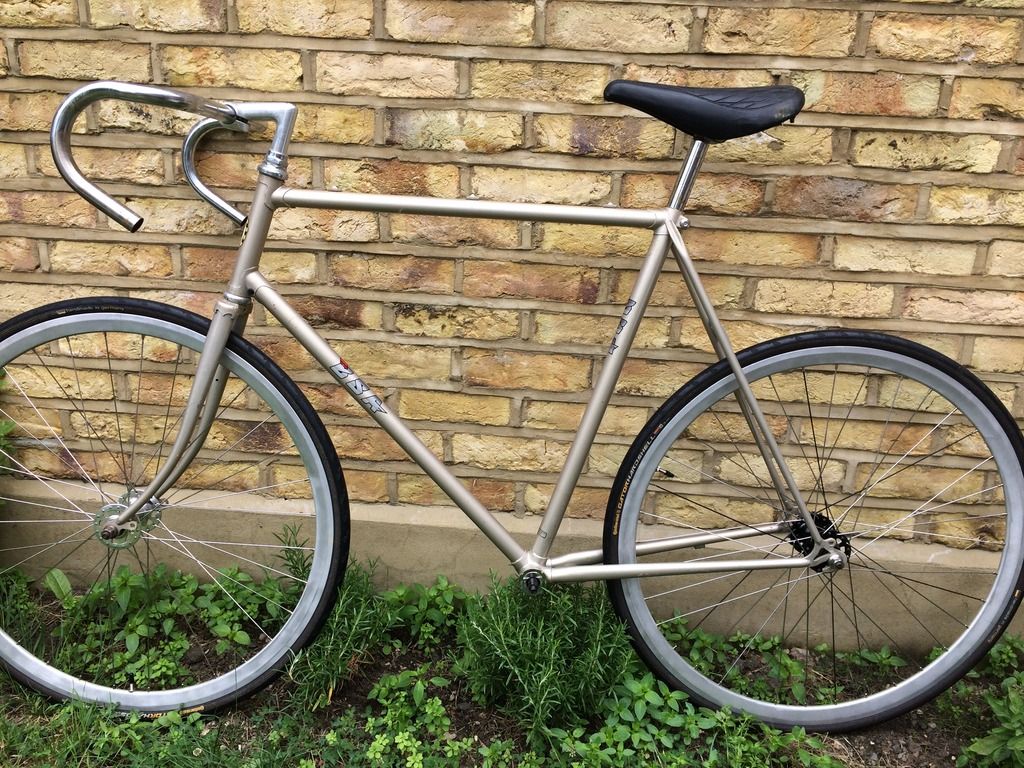
So I have had this bike in the garden for over a year with the best intentions of riding it as it was, however, is all rusted up and weighs a ton. No idea what sort of age it is because I bought it in immaculate condition off of some guy who had ridden it once when new then stored in a shed for 30 years! It even had stubble on the original gumwalls! I'm trying to keep this on the cheap as it'll be surplus to another bike I bought last weekend but realise there is a lot of work to do!
It's a weird off-gold colour so I'm having to decide what colour theme/parts to put on it. Any ideas would be great:
After stripping back and putting a new wheel set on it (purchased from @Vince on this forum); re-setting the brakes etc, it's looking like this:
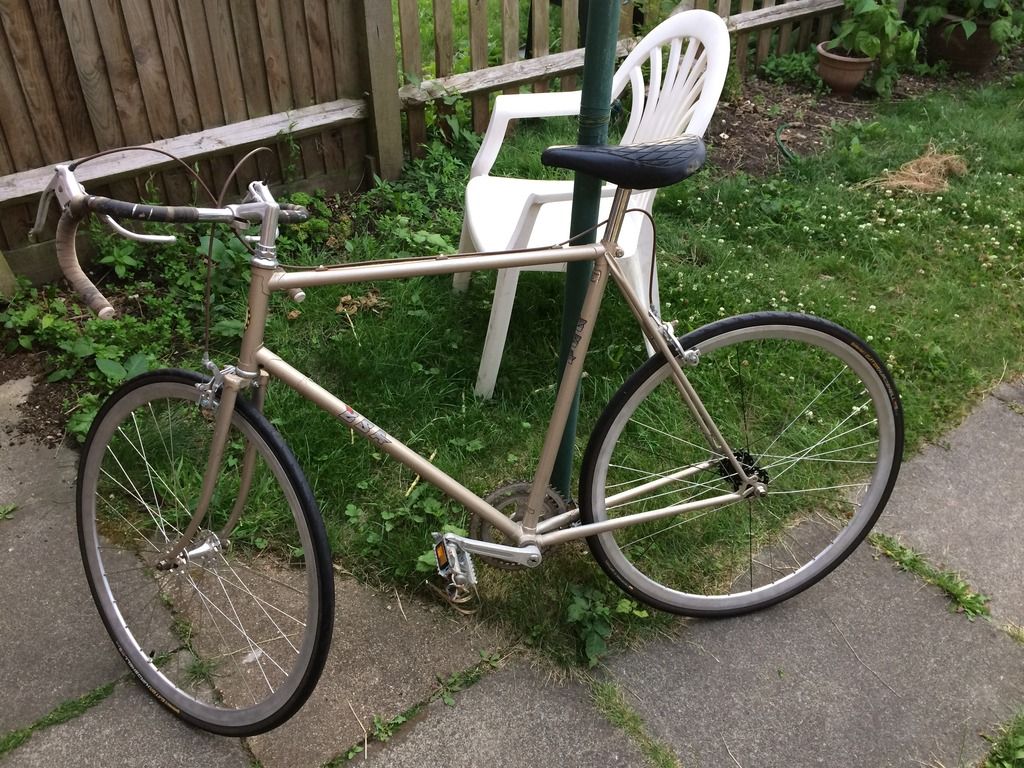
Tasks left to do/parts left to source:
Sort out drive train (new sprocket, cranks, and chain)
Praying for no chainline adjustments
Potentially new bar/levers
Potentially upgrade to dual pivot brakes, however, I'll need very long reach ones (~70mm drop)
Any suggestions, tips or comments would be greatly appreciated!