-
• #4327
If you are worried about it being asbestos,get it tested.
-
• #4328
is rewiring or replacing this phone entry / intercom system something i need to solder or need an electrician for?

-
• #4329
Looks like a staightforward pstn swap out - an alarm installer may be a better bet than an electrician - i take it that it's something you're not confident to undertake?
-
• #4330
i'm happy to give it a go provided i have decent instructions - from my initial research it was the comments like "be careful or you'll out the system for the whole block" on various diy forums which prompted my question
-
• #4331
what's wrong with the existing unit, and are there any model/part numbers?
how many white cables go into the unit?
A piccy of the places where the existing wires are terminated would also help
-
• #4332
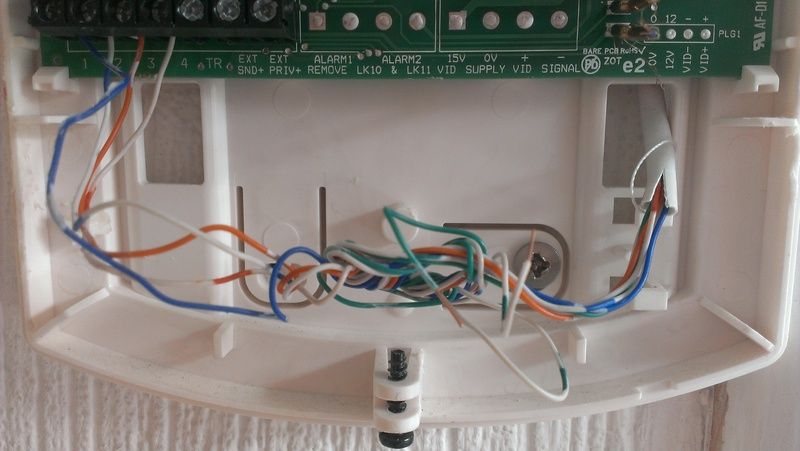
If you're only doing your end, you're relying on whoever installed the system having terminated the wires at the main unit in a predictable way. Make a note of how yours are terminated currently and see if that it easily translated to whatever replacement you get.
-
• #4333
Been a mad few weeks on the garden. Started with a wood chipper removing most of the garden. Then had a digger, teleporter and tractor in to level it off - with a 12 tonne trailer in the road!
I've been seeding it all over the last week, fingers crossed we will have a lawn one day!
-
• #4334
this is the existing unit, which i believe this document pertains to (useful!)
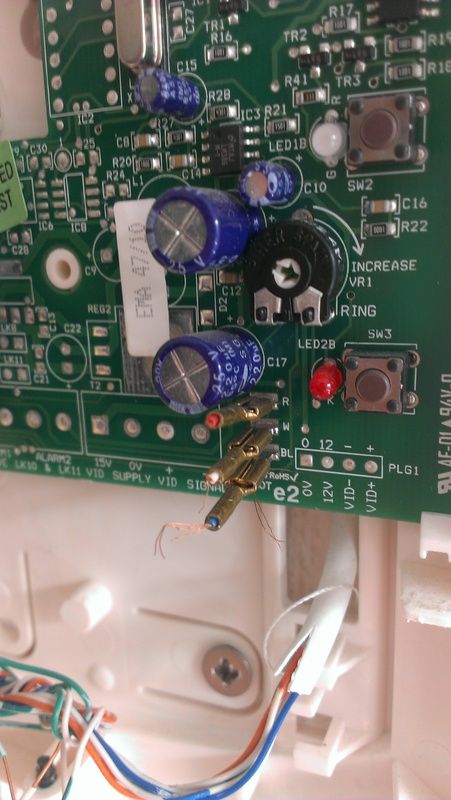
this is a close up of the bundle of wires which seem irrelevant:

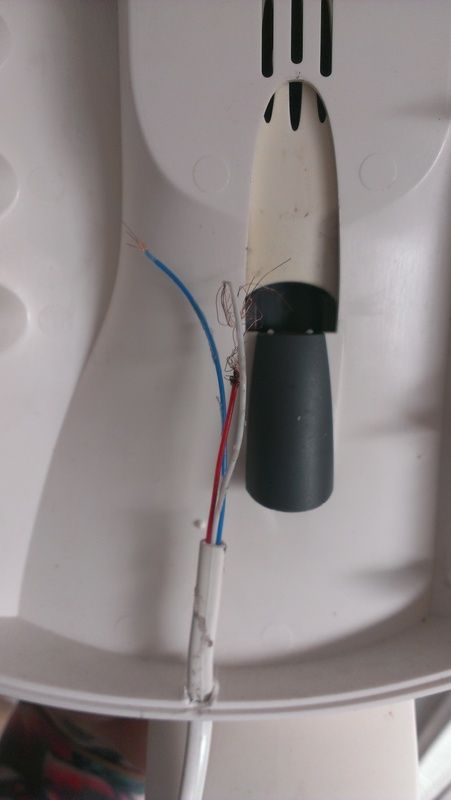
and a closer look at the b/r/w wire endings which were severed:

from the corresponding wires on the outer part of the handset which comes away:

from the instructions of the booklet i found (link above) it looks like i just need to reconnect the b/r/w wires?
-
• #4335
- There is a garden in there somewhere.
Chipper in - starting to get clear.
Digger in - this was fun!
Little bonfire to burn off some of the green.
Leveled off the garden - as well as you can on a slope.
Fence up and seeding.
- There is a garden in there somewhere.
-
• #4336
^ no swimming pool? am dispapoint..
-
• #4337
ah, some fucker pulled the handset off!

the unit is powered by -50V from the striped telephone wires - so don't disturb those.
it's a case of replacing the crimped ends [spares and crimp tool easily found in places like Halfords] on the handset cable then removing the severed ends that are still attached to the circuit board and plugging in the new crimped cables - when you do this bit wear some marigold gloves as you don't want to be touching the blue cylinders (capacitors), and causing problems on the circuit board. A pair of needle nose / radio pliers would be handy for this step.
In summary, you wouldn't be harmed by working on this, from the supplied document each handset is on a separate set of terminals so unlikely to disrupt the other tenants if it stops working. But if it stops working you may need to replace the whole assembly, so take care.
-
• #4338
Been a mad few weeks on the garden. Started with a wood chipper removing most of the garden. Then had a digger, teleporter and tractor in to level it off - with a 12 tonne trailer in the road!
wow - a teleporter! awesome...
-
• #4339
Go for it, as Rive says. Poundland might have wire strippers in the DIY section.
-
• #4341
Lufguss brainstorming needed.
Please look at photo below. The area in yellow is to be tiled, I have no intention of removing the modular units in my kitchen. The photograph shows the space underneath the modular units.
So far so good.
I do however need to get some levelling compound down onto the yellow area. I'd like to get the compound to go all the way to the legs of the modular units. That way I can tile all the way to the legs, then cover tiles partially as I re-install the skirting board.
But how the fuck do I control the flow of levelling compound? It would seem like a bad idea to let it run all the way underneath the modular units. I was thinking of making a barrier of wood planks along the floor behind the legs, but now that I am looking at it I doubt I'll be able to execute that idea.
-
• #4342
What is the blue stuff this guy is using to stop the compound running into the next room?
-
• #4343
Yeah, just replace the connectors. Make sure that you get connectors that will fit the wires and the spade connectors on the board. Also a decent crimping tool to do the crimping, i use a bit of leaded solder as I have had years of poor crimping tools and having to double up to get a good join.
Also careful when removing the connectors as pulling them out might damage the spade connector on the board. A trick can be to lift the tab on the connector
-
• #4344
Is it the membrane underneath the wood?
-
• #4345
I think you are right. He had the foresight to cut the membrane large enough to allow him to flip the edges upwards and create a little pool for the levelling compound.
That I cannot do... so I am actually leaning towards doing something with brown packing tape around the legs of the kitchen units.
Yes?
-
• #4346
Fitted wardrobes:
Who has some? How much should I pay? Can I make my own that won't look shit?
Pics???
-
• #4347
£2-3k
-
• #4349
You could use some damp course membrane, it is cheap enough stuck round the edge and formed in to an L shape so some goes under the new floor. You would need to stick the edge down to the floor and await it to seal. Would be a better finish than using packing tape.
-
• #4350
We made our own depends what look you would want. I went for solid wood and hung narrow pine doors. Mrs. Spenceey's is a walk in cupboard (big enough I was considering making it an en suite) and mine is the other side of the room to one side of the chimney breast.
 lynx
lynx ioreka
 rive_gauche
 stevo_com
 spenceey
 villa-ru
 rodabod
 starfish&coffee
 Dammit
 Mr_Sworld
 @hippy
penny to a pound of shit that external chimney piece sits atop / cemented onto the asbestos flue, cheapest thing would be to leave it well alone by boxing it in.